- AtoZ Cursive
- Cursive Alphabet
Cursive Alphabet A to Z
AtoZ Cursive offers free printable cursive alphabet A to Z worksheets with a complete step-by-step guide on how to write the uppercase and lowercase cursive letters. Download our free printable cursive alphabet worksheets to master cursive writing!
What are Cursive Alphabets?
Before exploring the cursive alphabet, it’s important to understand cursive writing.
Cursive writing is a style of handwriting in which letters are written in a smooth, flowing manner, usually connected with continuous strokes rather than separated as in print writing. This style makes writing faster, more natural, and visually elegant. It also improves fine motor skills, hand-eye coordination, and overall handwriting fluency.
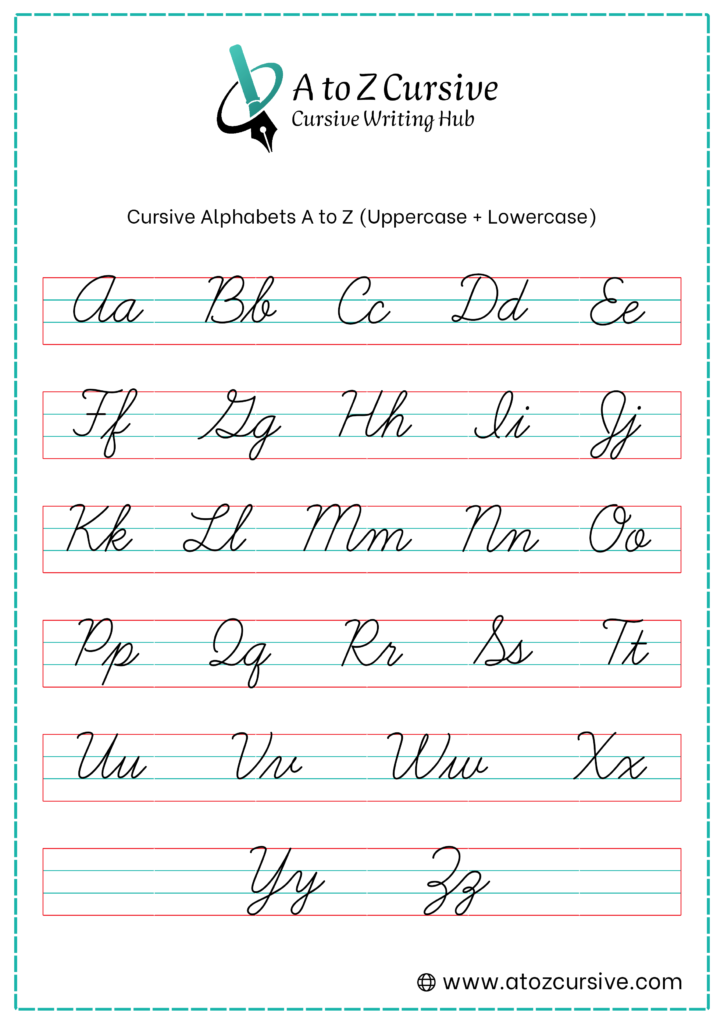
The cursive alphabet is the complete set of letters from A to Z written in this connected style. Unlike printed letters, cursive letters have unique strokes and joining lines that allow them to flow smoothly within words. Practicing the cursive alphabet A to Z, including both uppercase and lowercase forms, helps learners develop confident, neat, and consistent handwriting.
Why Is the Cursive Alphabet Important?
The cursive alphabet is the foundation of cursive writing. Before learners can write cursive words, sentences, or paragraphs, they must first learn how to form and connect each uppercase and lowercase cursive letter correctly.
Mastering the cursive alphabet improves letter formation, connecting strokes, spacing, and writing fluency. It also develops fine motor skills, pencil control, and hand-eye coordination, helping learners build neat, legible, and confident cursive handwriting.
How to Write Cursive Alphabet A to Z?
Learning the cursive alphabet A to Z becomes much easier when you follow a structured, step-by-step approach. Start by mastering lowercase cursive letters, then learn uppercase letters before progressing to joining letters, words, sentences, and paragraphs. Regular practice with free printable cursive alphabet worksheets improves letter formation, writing fluency, spacing, and overall handwriting.
Practice Lowercase Cursive Letters
Start with lowercase cursive letters, as they are the foundation of cursive writing and are used most often in everyday handwriting. Instead of learning the cursive alphabet strictly from A to Z, practice letters with similar stroke patterns together. This approach improves letter formation, strengthens muscle memory, and makes it easier to learn new letters.
- Rounded Cursive Letters (Group 1): Begin with letters that use rounded strokes, including C, A, D, G, O, and Q. These letters help you develop smooth curves, consistent letter shapes, and better pencil control.
- Tall Loops and Upstrokes (Group 2): Once you’re comfortable with rounded letters, practice I, U, W, T, E, L, H, K, and B. These letters introduce tall loops and upward strokes, helping you improve stroke direction, writing rhythm, and consistency.
- Connecting Letters (Group 3): Next, practice N, M, V, X, Y, and Z. These letters strengthen connecting strokes and improve the smooth flow of cursive handwriting.
- Advanced Letter Forms (Group 4): Finish with J, F, R, S, and P, which have more complex shapes and require greater pencil control. Mastering these letters completes your understanding of the lowercase cursive alphabet.
Once you’ve mastered lowercase cursive letters, you’ll have the confidence and control needed to learn uppercase cursive letters, which are used for names, titles, and the beginning of sentences.
Learn Uppercase Cursive Letters
After mastering lowercase cursive letters, the next step is to learn uppercase cursive letters. Capital letters are used at the beginning of sentences, for names, titles, and proper nouns, making them an important part of cursive writing. Instead of practicing the alphabet strictly from A to Z, group letters with similar stroke patterns to make learning easier and more effective.
- Rounded Uppercase Letters (Group 1): Begin with letters that use rounded strokes, including C, E, G, O, and Q. These letters help you develop smooth curves, balanced letter shapes, and better pencil control.
- Looped Uppercase Letters (Group 2): Once you’re comfortable with rounded letters, practice A, L, H, K, B, and F. These letters introduce larger loops and flowing strokes, helping you improve letter formation, stroke direction, and writing consistency.
- Straight and Slanted Letters (Group 3): Next, practice I, J, T, U, W, and Y. These letters help you maintain consistent height, spacing, and smooth upward and downward strokes.
- Advanced Uppercase Letters (Group 4): Finish with M, N, P, R, S, V, X, Z, and D, which have more detailed shapes and require greater precision. Mastering these letters completes your understanding of the uppercase cursive alphabet.
After mastering all four groups, you’ll be ready to practice uppercase cursive letters. Once you’re comfortable with both lowercase and uppercase letters, you can move on to joining letters, cursive words, sentences, and paragraphs to build speed, fluency, and confidence in cursive writing.
FAQs
Begin with lowercase cursive letters a to z, focusing on smooth strokes, even spacing, and proper connections. Then practice uppercase cursive letters and start joining letters to form words and sentences.
Yes. We provide complete cursive alphabet worksheets that include both uppercase (capital) and lowercase letters, along with step-by-step tutorials to help learners master proper letter formation.
Start with lowercase cursive letters because they are used more often and have simpler stroke patterns. Once you’re comfortable with them, move on to uppercase letters.
Instead of following the alphabet from A to Z, practice letters with similar stroke patterns together. This makes letter formation easier and helps build muscle memory more effectively.
The cursive alphabet is the foundation of cursive writing. Learning each letter correctly makes it easier to connect letters, write words smoothly, and develop neat, consistent handwriting.
Most beginners start with rounded letters such as C, A, D, G, O, and Q because they use similar strokes and are easier to form.
Grouping letters with similar strokes helps learners practice the same hand movements repeatedly. This improves letter formation, muscle memory, and overall handwriting consistency.
A correctly written cursive letter has the proper starting point, smooth strokes, consistent size, and even spacing. Comparing your writing with a cursive alphabet worksheet can help you spot and correct mistakes.
After mastering the cursive alphabet, practice joining letters, then move on to cursive words, sentences, and paragraphs to improve writing fluency and confidence.
Practice the cursive alphabet for 15–20 minutes each day. Short, consistent practice sessions are the best way to improve handwriting, build muscle memory, and increase writing confidence.